Topics
Marigold Starter Kit Guide: Instructions for growing marigolds from seed
Growing guidesCongratulations! You’ve got everything you need to start growing beautiful marigold flowers! The Marigold Starter Kit includes heirloom seeds are easy to grow and will brighten up your garden. In addition to their beauty, marigolds are a beneficial companion plant for vegetables and are also deer resistant.

Marigolds are one of our favorite flowers. It’s easy to get started growing marigolds from seed.
Marigold Starter Kit Growing Guide

Growing Marigolds From Seed
- Start by following the instructions for hydrating the soil discs. Once the soil is expanded and in pots, you are ready to start planting.
- Plant the marigold seeds 1/4 inch deep.
- The ideal soil temperature for germinating marigold seeds is between 70º and 80ºF. Simple to start indoors.
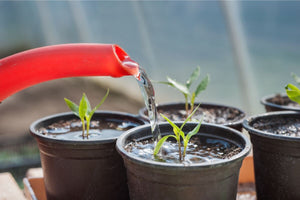
Knowing how and when to water is vital:
Water by misting until the marigold seeds start to sprout. This will take 5 to 10 days.
Take care that the seeds don’t dry out too quickly. Marigold seeds need to stay moist but not waterlogged to sprout.
A dome can help retain moisture. Keep the dome on until they begin to sprout.
Once the seedlings are growing, continue to keep the soil moist.
Less frequent but deep watering will encourage root growth.
The pot should not dry out completely between waterings, just the top layer of soil.
As the plants grow, water only the soil, keeping the plants dry.
Now that you’ve got your marigolds growing and the watering down, you’ll want to consider the other thing that flowers need – food. The soil that comes in your kit has added amendments that create a fertile growing environment. You may want to add fertilizer when you transplant to a garden or larger pots.
How to Transplant Marigold Seedlings Outdoors
To reach their full potential, marigolds need to be transplanted outdoors. The fiber pots included in the kit make transplanting easy.
Once the seedlings are 3 to 4 inches high and have several true leaves, you can transplant marigolds into a larger pot or directly into the garden. True leaves are not the first set that develops when the seed first sprouts. True leaves come later and have the shape of regular marigold leaves.
Tender marigold seedlings need time to adjust to outdoor conditions. Over the course of a week, harden off the marigold plants by placing them outside. Start with just a few hours a day and gradually increase the exposure time—no need to rush. Take your time and make sure the weather is over 60ºF before transplanting.
The included biodegradable pots can easily be planted directly into the garden. When soil and outside temperatures are above 60ºF, soak the pots to soften the fiber. Then, break the sides of the pot with your hands and bury the pot completely in the soil.
Adding organic matter, such as compost, to your garden beds before transplanting can help supplement the additional nutrients your marigold plants need as they grow.
Additional growing tips:
Thin out your seedlings early on once they have sprouted. Remove some sprouts to make room for the largest and strongest of them to grow without competition.
Marigolds make excellent companion plants. Try putting some in your vegetable garden.
For more Marigold Growing Tips, visit our Planter’s Library.
Marigolds are bright flowers with many benefits for the home garden. We hope you enjoy growing marigolds with this complete marigold starter kit.
Have more growing questions?
At Sow Right Seeds, we love gardening and want your experience to be successful. Explore our Planter’s Library for more gardening tips, and check out our selection of herb, flower, and vegetable varieties to see what you’d like to grow next!


Leave a comment